9 Effective Yoga Poses For Back Pain

Yoga acts as a mind-body-type therapy that tackles back pain, along with stress and other bodily dysfunctions. With that said, try out these 9 yoga poses that are effective for relieving back pain:
1. Bridge Pose
The Bridge Pose is known for energizing, rejuvenating, or restoring the body from body pains.
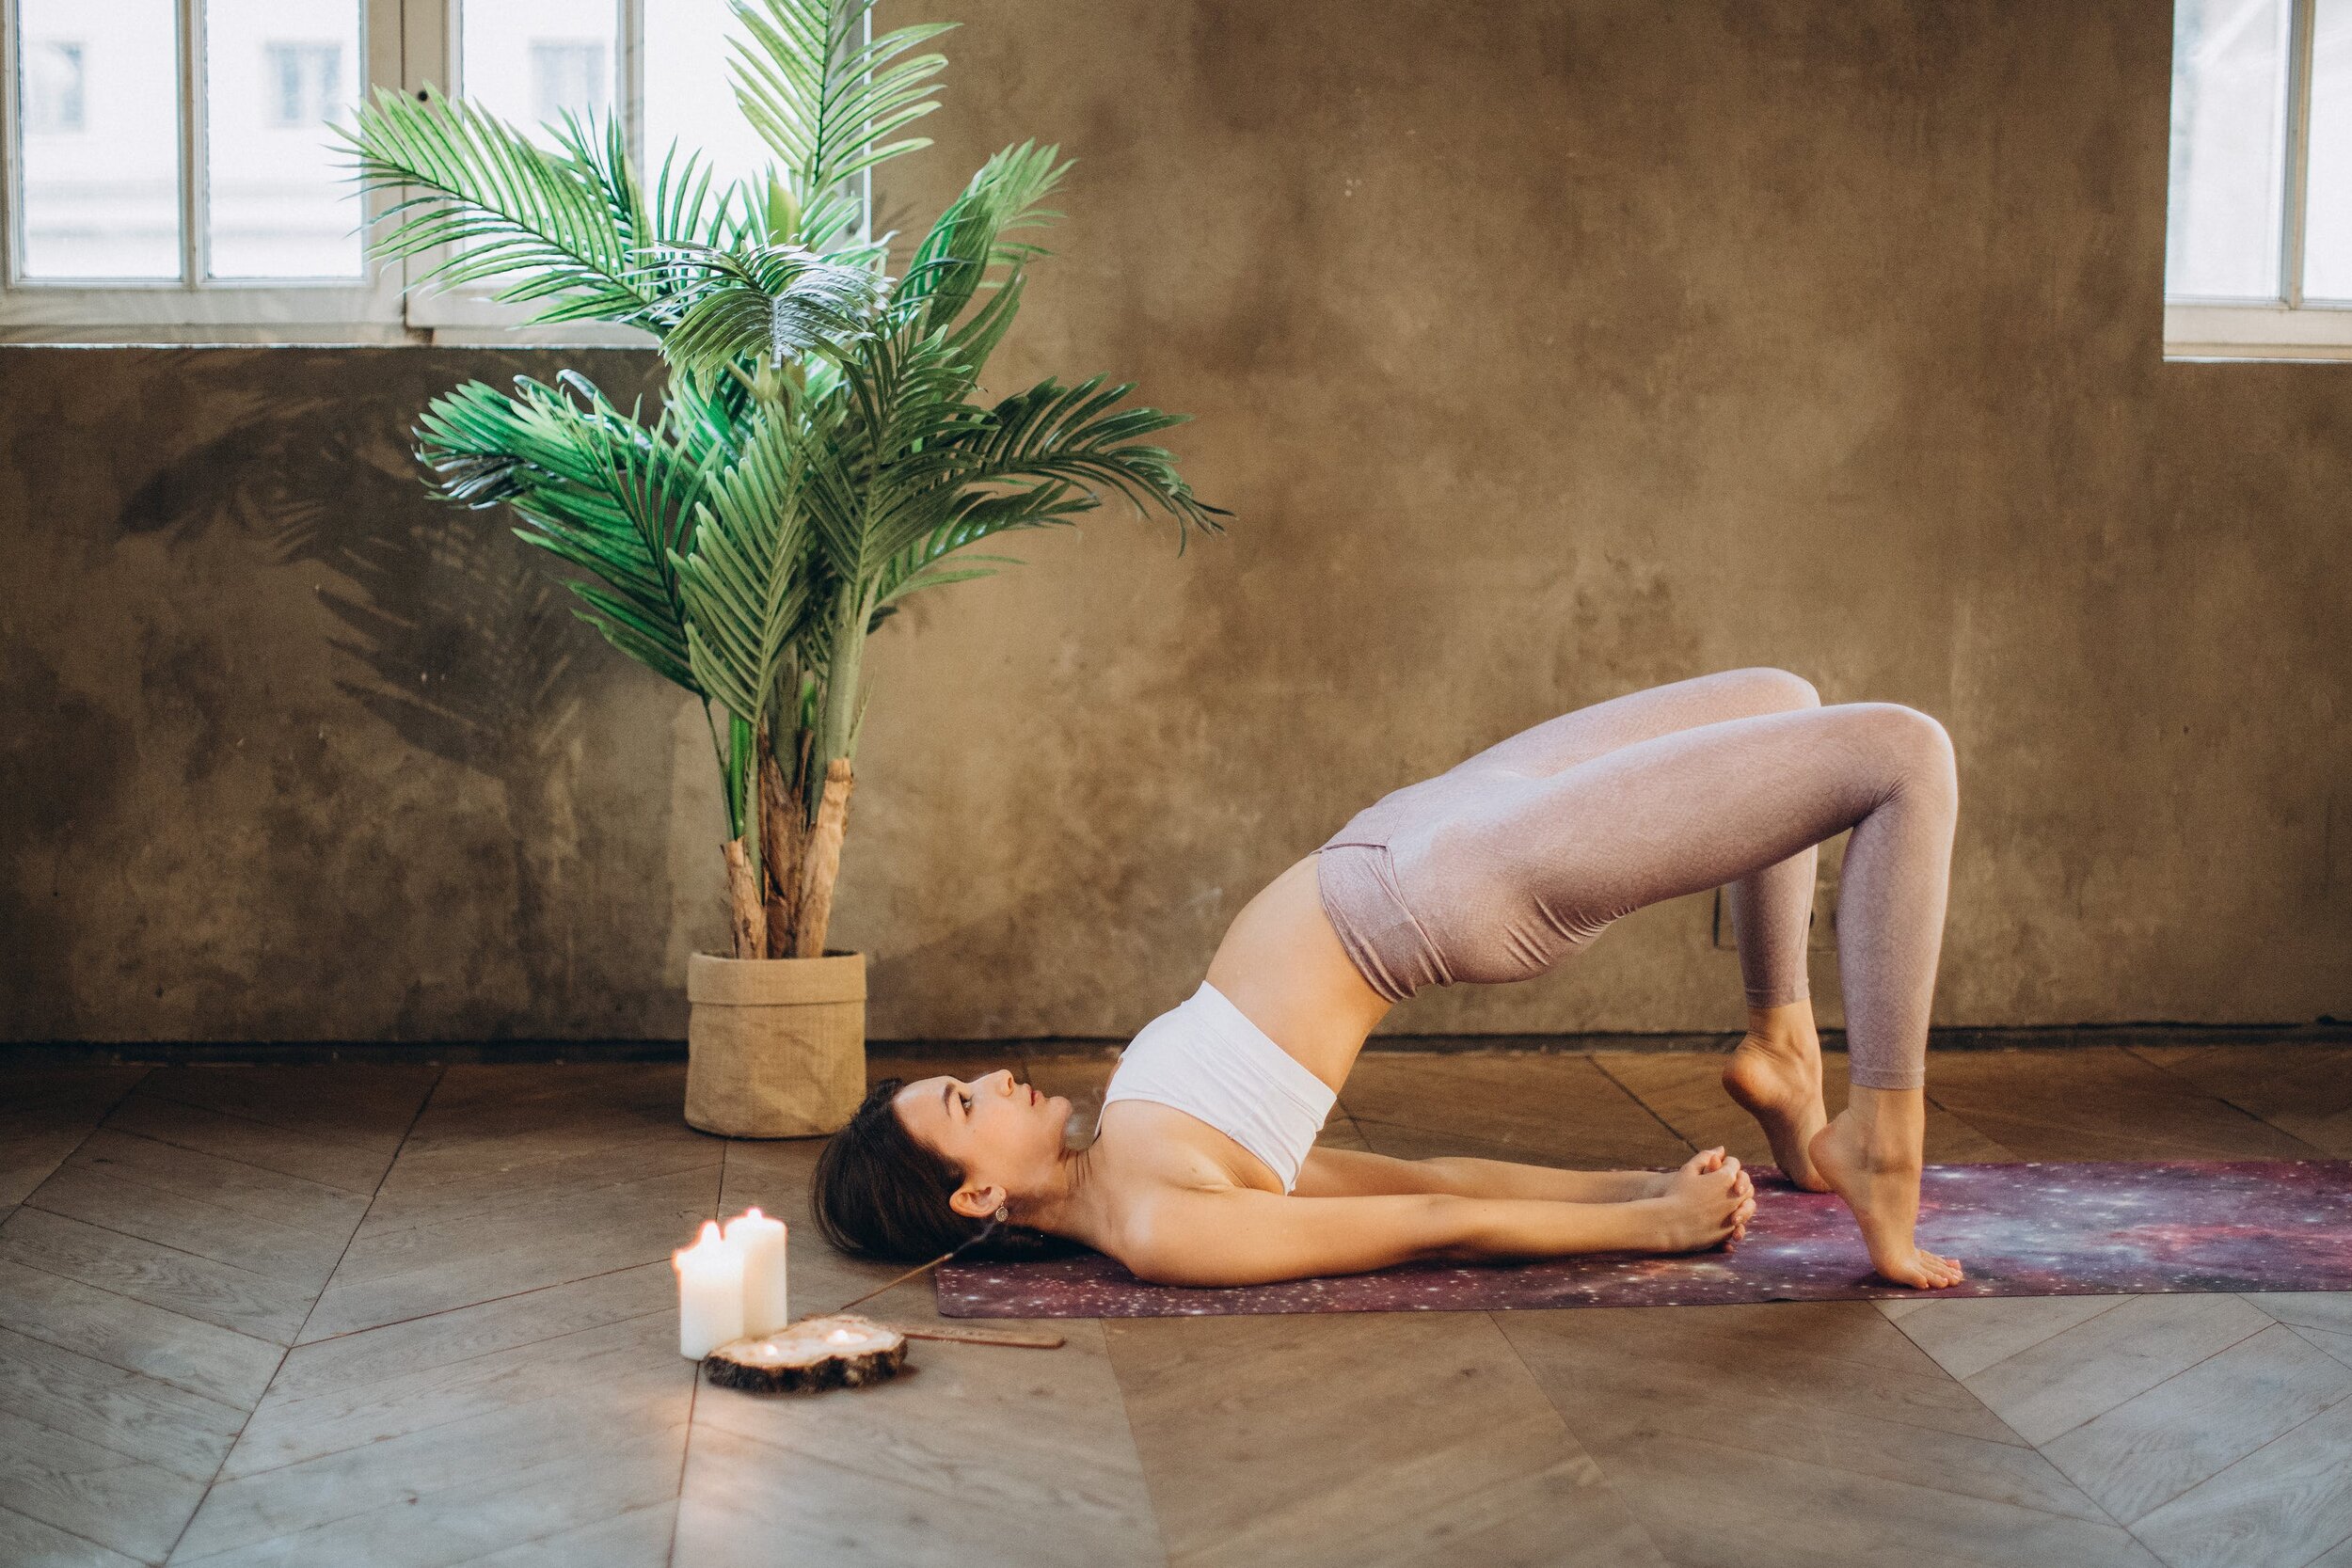
Step 1: Lie upward, with a blanket under your shoulders to protect neck. Bend knees, with feet on the floor, and heels close to the sitting bones.
Step 2: Exhaling, press inner feet and arms into the floor. Push tailbone upward toward the pubis. Lift buttocks off the floor. Clasp hands below pelvis.
Step 3: Lift buttocks until thighs are parallel to the floor. Push knees down, while keeping them away from hips. With tailbone toward the knees, lift the pubis toward the navel.
Step 4: Press the top of the sternum toward the chin. Firm outer arms, broaden shoulder blades, and lift the space between them at base of the neck up into torso.
Step 5: Stay for 30 seconds to 1 minute. Exhale and release slowly.
2. Cat Pose (Marjaryasana)
This pose will give your spine a gentle massage.
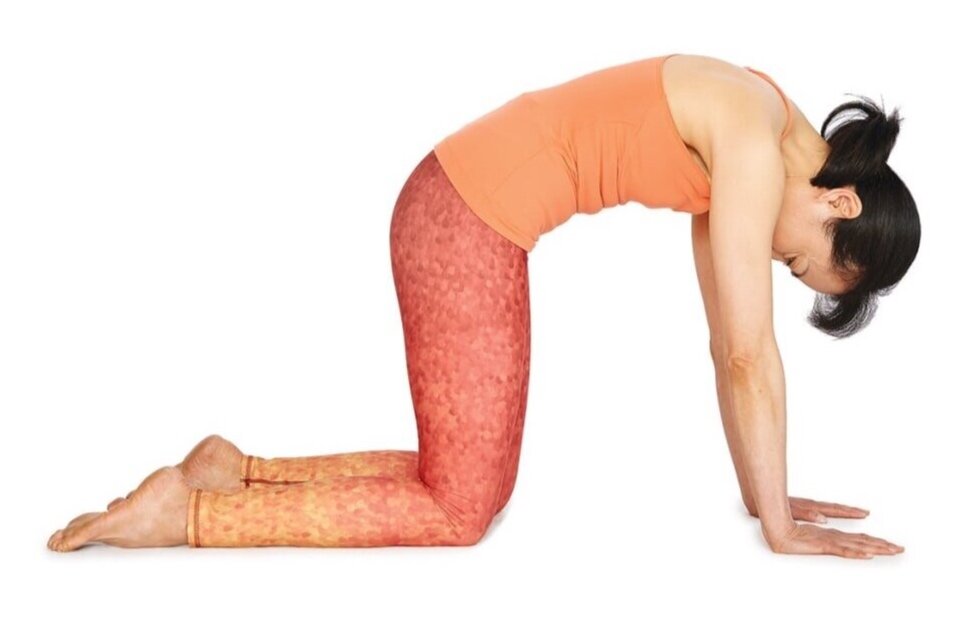
Step 1: Get in a "tabletop" position, with knees set directly below hips. Look down.
Step 2: Exhaling, round spine toward the ceiling, with shoulders and knees in position.
Step 3: Inhaling, come back to neutral "tabletop" position.
3. Cobra Pose (Bhujangasana)
The Cobra Pose promotes flexibility, which is good for your back.

Step 1: Stretch legs back with tops of the feet on the floor. Hug elbows back into the body.
Step 2: Press the tops of the feet, thighs, and the pubis firmly into the floor.
Step 3: Inhaling, lift chest off the floor. Narrow hips, without hardening buttocks.
Step 4: Push side ribs forward. Lift top sternum, distributing backbend throughout spine.
Step 5: Hold for 15 to 30 seconds. Release and exhale.
4. Warrior II Pose
This pose is based on the fierce warrior, Virabhadra, who had a thousand heads, eyes, and feet.

Step 1: Stand in Mountain Pose, with feet 3.5 to 4 feet apart. Raise arms, palms down.
Step 2: Turn right foot slightly to the right, and left foot left 90 degrees.
Step 3: Exhale. Bend left knee over left ankle. Strengthen right leg. Plant outer right heel.
Step 4: Stretch arms away from space between shoulder blades. Keep torso long. Press tailbone slightly toward the pubis. Turn head left. Look over fingers.
Step 5: Stay for 30 seconds to 1 minute. Inhale when rising. Reverse feet and repeat.
5. Warrior III Pose

Step 1: Stand in Mountain Pose. Exhale. Step left foot back into a high-lunge position, with right knee at a right angle. Lay torso down on mid right thigh. Bring hands to right knee. Squeeze knee. Lift torso. Exhale, turning torso slightly to the right.
Step 2: Stretch arms forward, palms facing each other. Exhale. Press right thighbone back. Straighten front leg. Lift back leg. Press tailbone into pelvis.
Step 3: Straightening front knee, press head of the thighbone back.
Step 4: Release hip [of the raised leg] toward floor until hips are parallel to the floor. Extend back leg towards the wall; reach in opposite direction with arms. Bring head up.
Step 5: Stay for 30 seconds to 1 minute. Exhale and release back to the lunge. Bring hands to the floor on either side of right foot. Exhaling, bring left foot forward to meet your right. After a few breaths, repeat on the other side.
6. Supported Headstand
Standing on your head in proper alignment can strengthen the whole body.

Step 1: Pad head and forearms with a folded blanket or mat. Kneel. Lace fingers together. Set forearms on floor. Roll upper arms slightly outward. Press head on floor.
Step 2: Inhaling, lift knees off floor. Walk to your elbows, heels elevated. Lift through top thighs, forming an inverted “V.” Firm shoulder blades against back. Lift toward tailbone.
Step 3: Exhaling, lift feet off the floor. Firm tailbone against back of pelvis. Turn upper thighs in slightly. Press heels toward ceiling.
Step 4: Firm outer arms inward, and soften the fingers. Draw shoulder blades toward tailbone. Keep weight evenly balanced on the two forearms. Press up through the balls of the big toes.
Step 5: Beginners stay for 10 seconds. Add 5 to 10 seconds onto your stay every day until you’re comfortable holding the pose for 3 minutes. Add more seconds until you can stay for 5 minutes. Exhaling, come down, with both feet touching the floor at the same time.
7. Downward-Facing Dog
This pose helps relieve headache, back pain, and fatigue.

Step 1: Come down on hands and knees. Set knees directly below the hips, and hands slightly forward of your shoulders. Spread palms, and curl the toes.
Step 2: Exhaling, lift knees away from the floor, with heels off the floor. Press tailbone lightly toward pubis. Lift sitting bones toward ceiling. Draw inner legs up into the groins.
Step 3: Exhaling, push top thighs back, and stretch heels onto the floor. Straighten – don’t lock – your knees. Roll upper thighs inward slightly. Narrow front of the pelvis.
Step 4: Firm outer arms. Lift along your inner arms from wrists to shoulder tops. Firm shoulder blades against your back, then widen and draw them toward tailbone.
Step 5: Stay in this pose 1 to 3 minutes. Exhaling, bend knees to the floor.
8. Upward-Facing Dog
This pose helps you strengthen the spine.

Step 1: Lying down, stretch legs back, with tops of your feet on the floor. Bend elbows. Spread palms on the floor beside waist.
Step 2: Inhale. Press inner hands firmly into the floor. Straighten arms. Inhaling, lift torso and legs inches off floor. Keep thighs firm, slightly turned inward. Have arms firm and turned out, so elbow creases face forward.
Step 3: Press tailbone toward pubis. Narrow hips. Firm buttocks.
Step 4: Firm shoulder blades against the back. Push side ribs forward. Look straight ahead.
Step 5: Exhaling, release back to the floor.
9. Seated Forward Bend
This pose stretches the spine, shoulders, and hamstrings.
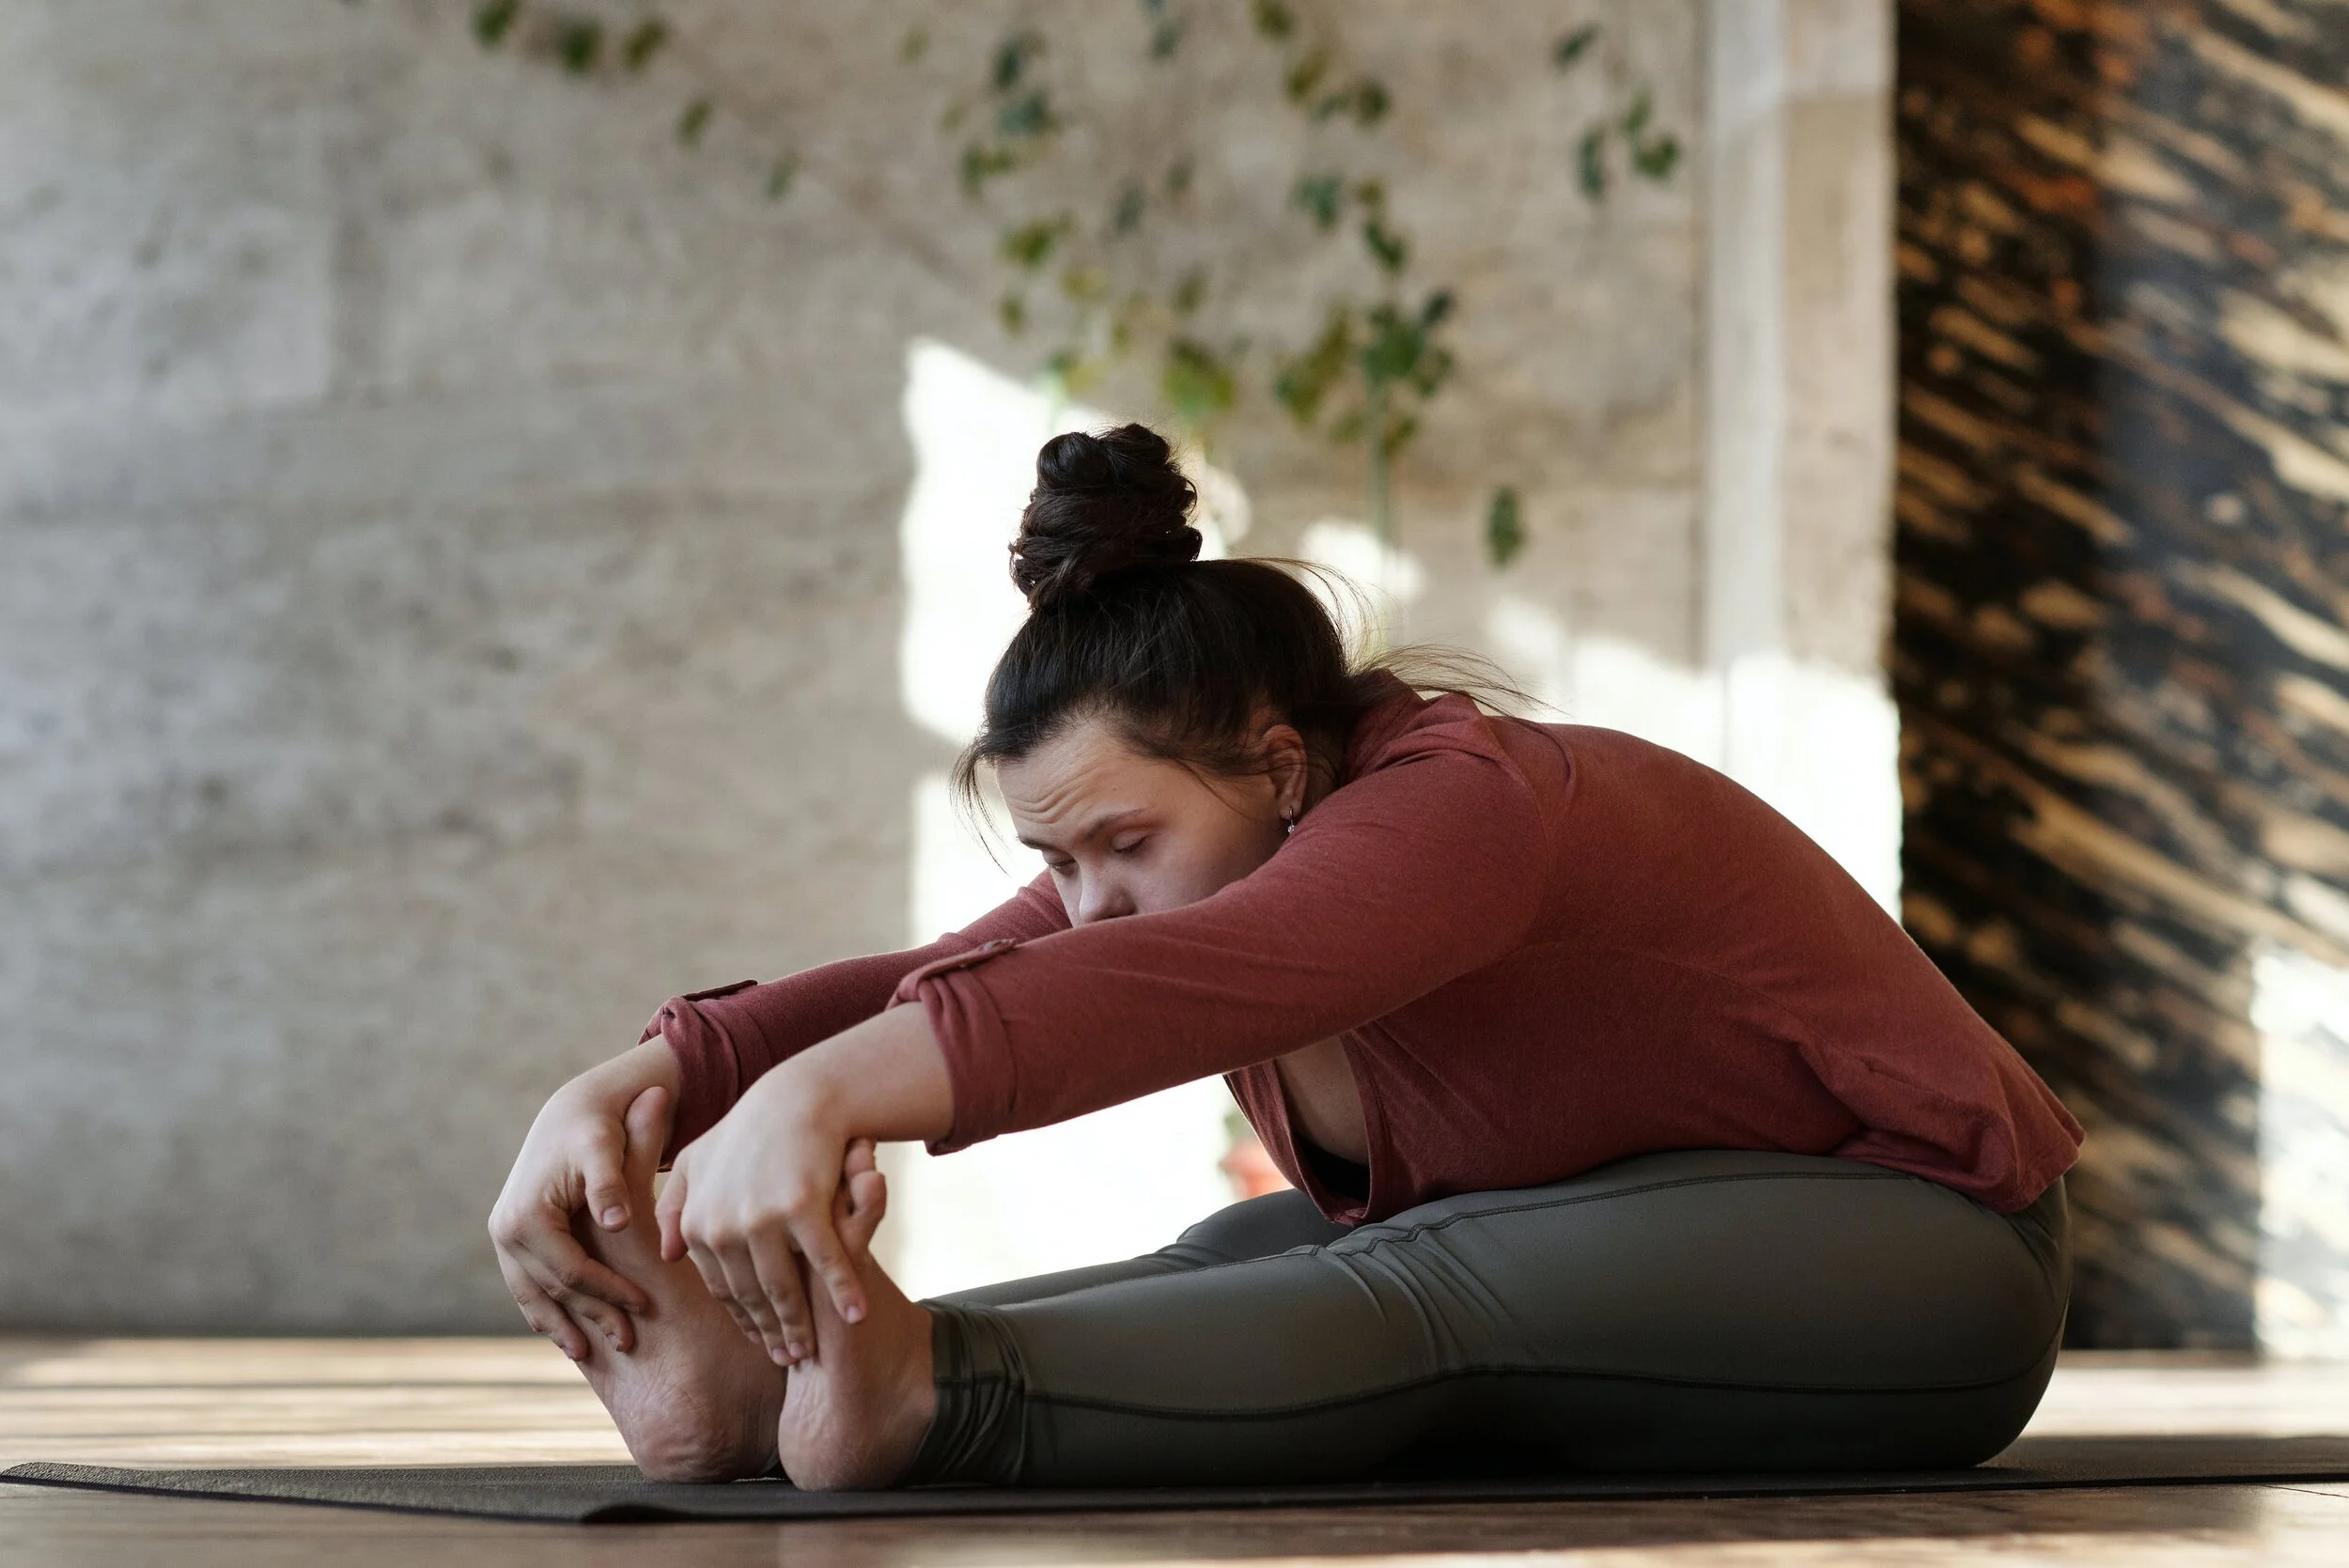
Step 1: Sit with buttocks on a folded blanket, and legs straight in front of you. Rock slightly onto left buttock, and pull right sitting bone away from heel with right hand. Repeat on the other side. Turn top thighs in slightly, and press them down into the floor. Press through your palms on the floor beside hips. Lift top of the sternum toward the ceiling as top thighs descend.
Step 2: Draw inner groins deep into the pelvis. Inhale. Lean forward from hip. Lengthen tailbone away from back of pelvis.
Step 3: Don't force a forward bend. Always lengthen front torso into the pose, with head raised. Either bend the elbows out to the sides and lift them away from the floor, or (using a strap) lighten your grip and walk hands forward, keeping the arms long. Lower belly should touch thighs first, then upper belly, ribs, and head.
Step 4: Inhaling, lift, and lengthen front torso. Exhaling, release slowly into the forward bend. Stretch arms out beyond the feet.
Step 5: Stay from 1 to 3 minutes. Lift torso away from thighs. Then, straighten elbows. Inhale. Lift torso up by pulling tailbone down and into pelvis.
Conclusion
Yoga can be a wonderful way to help decrease back pain and improve core strength. Try these 9 poses to help you get back on track. As with any physical activity, stop immediatly if you experience pain during these moves. Always consult a doctor before starting any new exercise. Once you learn the basics, you can use these 9 poses in your next back relief regimen.
Kristin Herman writes at Academized.com and Ukwritings.com. As a yoga enthusiast, she blogs about the health benefits of yoga.
Read Related Articles